This feature allows auxiliary products and services to be tied to a main flooring product. When the main product is used, the auxiliary items are calculated based on user-defined rules and then added to the takeoff.

This type of Add-On should be used when an auxiliary item is always going to be allocated along with a specific material. Although multiple Add-Ons may be linked to a main product, it is not possible to "nest" them within each other. Example: a certain carpet could have both pad and labor charges linked to it, but neither the pad nor the labor charge could themselves have Add-Ons assigned.
How To:
Create Product Add-Ons
|
1. Open the Product List. |
|
|
2. Click the |
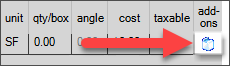 |
|
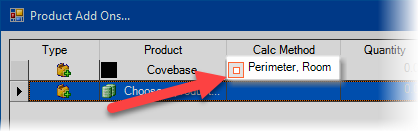
3. In the window that appears, click the "Choose a Product" button. This will open the product selector. |
|
|
4. Left-click a product or service to select it and click OK. |
|
|
5. Most items will default to a specific calculation method. It can be changed by clicking the Calculation Method drop-down box next to the item. |
 |
|
6. If additional Add-Ons are to be created, click the "Choose a Product" button on the next empty line and repeat steps 4 and 5. |
 |
|
7. Click "OK" to apply the Product Add-On(s). |
|


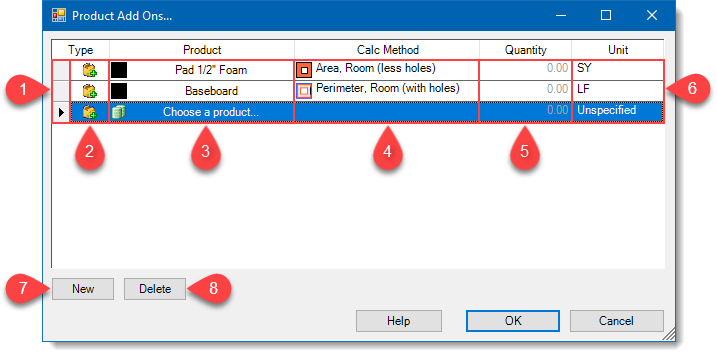
The "Product Add-Ons" Window
Click the  or
or  button associated with an item on the Product List to open a window in which the the Product Add-Ons linked to that item may be configured.
|
1. Select |
|
2. Type |
|
3. Product |
|
4. Calculation Method |
|
5. Quantity Note: Product Add-Ons are calculated when the Worksheet is accessed. As such, the Quantity column will display 0 unless the calculation method is set to "Manual" and a fixed amount is entered. |
|
6. Unit |
|
7. New |
|
8. Delete |
Comments
Article is closed for comments.